[ad_1]
Recently, one of our readers asked us how they can prevent overselling out of stock items in their online store.
When a customer purchases an item that isn’t available, it can lead to disappointment, loss of trust, and a negative user experience. However, you can reduce refunds and improve customer satisfaction by not allowing out of stock items to be sold.
In this article, we will show you how to easily prevent overselling out of stock items in WordPress, step by step.
Why Prevent Customers From Buying Out of Stock Items in WordPress?
If you have an online store, then overselling out of stock items can lead to customer disappointment and complicate order fulfillment.
For example, if you sell clothes and a customer places an order for a shirt that isn’t available, then you may have to manually adjust orders, track down a replacement, or contact the customer about product substitutions.
This can damage your brand reputation heavily and users may even leave negative customer reviews on your WordPress site.
By improving your inventory management, you can ensure that you always have the items customers want and can inform them if they go out of stock. Doing this will boost your sales, reduce complaints, and enhance your store’s credibility.
Having said that, let’s see how to easily prevent overselling out of stock items in WordPress with WooCommerce, Easy Digital Downloads, and WP Simple Pay.
You can use the links below to jump to the method of your choice:
Prevent Overselling Out of Stock Items in WooCommerce
If you have a WooCommerce store, then this method is for you.
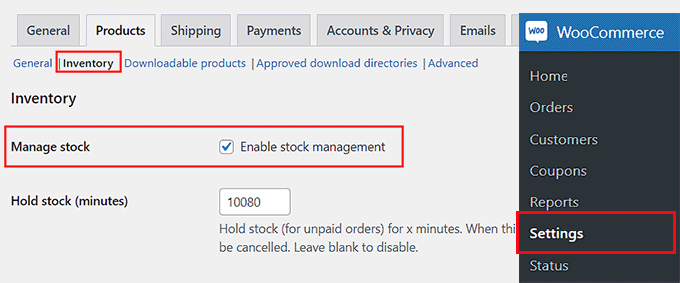
You can easily prevent overselling products by visiting the WooCoomerce » Settings page from the WordPress dashboard and switching to the ‘Products’ tab.
Once you do that, click on the ‘Inventory’ link. This will open some new settings on your page where you must check the ‘Enable stock management’ option.
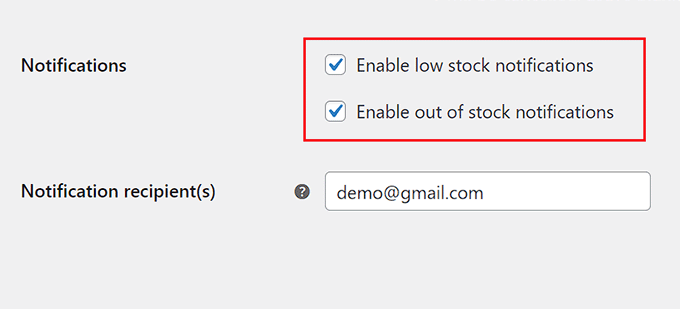
After that, scroll down to the ‘Notifications’ section and check the ‘Enable low stock notifications’ and ‘Enable out of stock notifications’ options.
You will now receive an email notification when a product has low stock or goes out of stock.
Now, you can add the email address where you want to receive these notifications next to the ‘Notification recipient(s)’ option. You can also add multiple email addresses by separating them with a comma.
Next, you can add the low stock threshold according to your liking. You will be sent an email when the product stock reaches this amount.
For instance, if you are selling a customized jewelry piece and have set the low stock threshold to 2, then you will get an email when your store has only 2 of the jewelry pieces left.
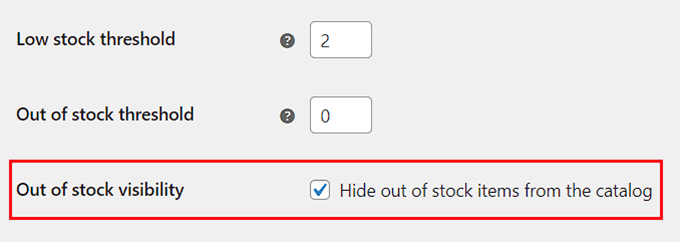
Next, you will see the ‘Out of stock threshold’ option, which you can leave as is. This setting will change a product’s status to ‘Out of Stock’ automatically once the stock reaches zero.
Additionally, you can check the ‘Hide out of stock items from the catalog’ option. This means that out of stock items won’t be displayed in your shop’s product catalog when users browse through your store.
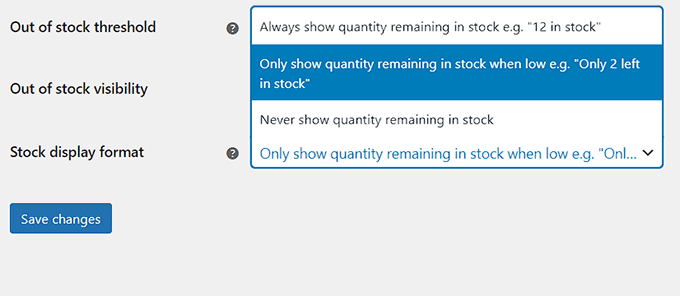
Then, you can also configure the ‘Stock display format’ option from the dropdown menu.
For instance, if you want to show the stock quantity of each product to your users, then you can select that option.
You can choose the ‘Only show quantity remaining in stock when low’ option if you want the users to know when only 2 items for that product are left in the inventory. This option can create a sense of urgency among visitors and may encourage them to buy your products.
However, if you don’t want to display stock quantity at all, then you can pick the ‘Never show quantity remaining in stock’ option.
Finally, click the ‘Save changes’ button to store your settings.
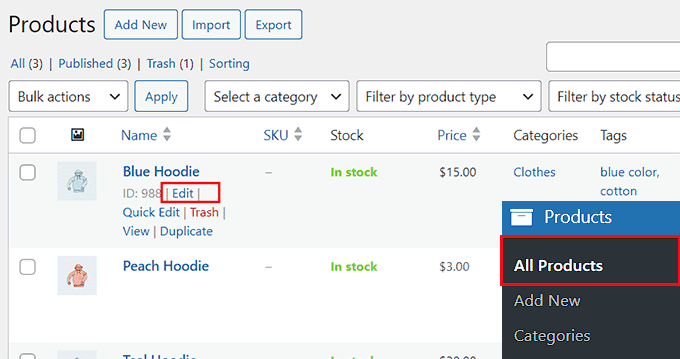
Now you must visit the Products » All Products page from the WordPress dashboard to configure the stock quantity of individual items.
To do this, click the ‘Edit’ link under any product.
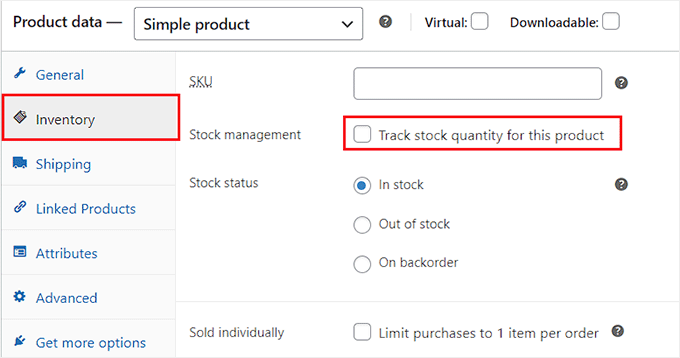
This will open a new screen, where you must scroll down to the ‘Product Data’ section and switch to the ‘Inventory’ tab.
Next, check the box next to the ‘Stock management’ option.
This will open some new settings and you can start by adding the quantity for the product you are editing. For instance, if you are selling a blue colored hoodie and have 10 items of it in stock, then you can add that value next to the ‘Quantity’ option.
Once you do that, you must select the ‘Do not allow’ option for the ‘Allow backorders?’ setting.
Backorders are like pre-orders for out of stock items. Now, customers won’t be able to place orders for unavailable items and there will be less chance of user dissatisfaction.
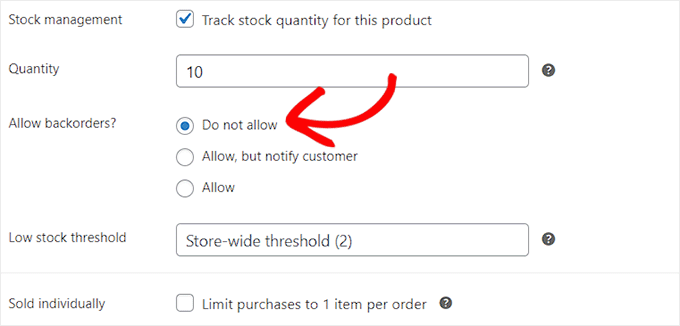
After that, you can add a low stock threshold for the product. If you don’t configure this setting, then the storewide low stock threshold that you configured earlier will be applied for the individual product.
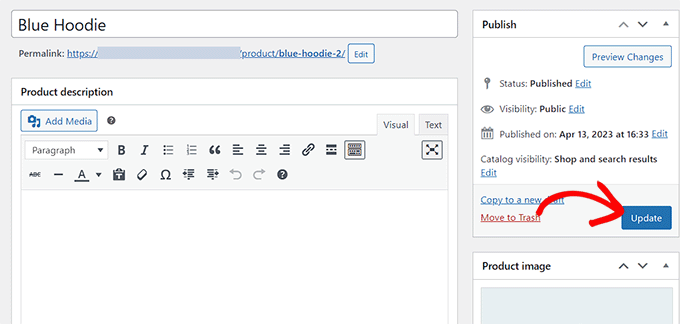
Finally, click the ‘Update’ button at the top to store your settings. You have now successfully prevented overselling out of stock products in WooCommerce.
Prevent Overselling Out of Stock Items in Easy Digital Downloads
If you sell items via Easy Digital Downloads, then this method is for you.
Easy Digital Downloads is the best WordPress plugin for selling digital products like music, eBooks, spreadsheets, software, and more.
Usually, vendors do not need to create a purchase limit for digital files. However, if you are selling items on your such as tickets to an event with a specific limit or an expiration date, then you will have to prevent overselling sold-out tickets.
You can easily do this using the plugin’s Purchase Limit extension.
First, you will need to install and activate the Easy Digital Downloads plugin. For detailed instructions, see our step-by-step guide on how to install a WordPress plugin.
Note: EDD has a free plan. But you will need the pro plan of the plugin to unlock the Purchase Limit addon.
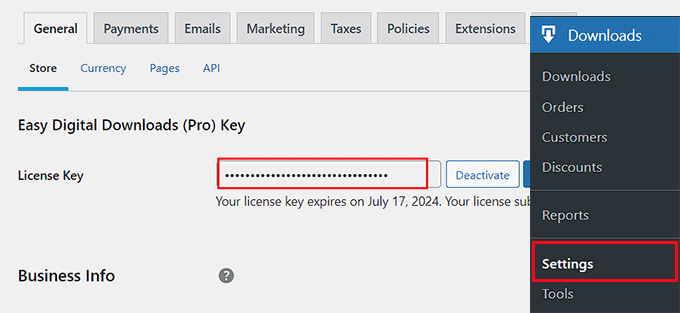
Upon activation, head to the Downloads » Settings page from the WordPress admin sidebar and enter your license key.
You can find this information in your account on the Easy Digital Downloads website.
Next, you must set up your store and add digital products. For detailed instructions, you can see our beginner’s guide on how to sell digital downloads in WordPress.
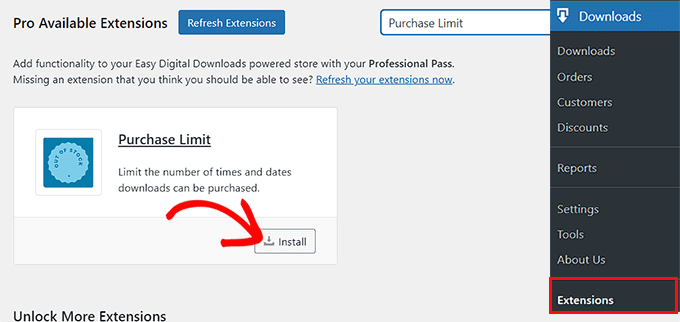
Once you have done that, visit the Downloads » Extensions page from the WordPress dashboard.
Here, you must locate the ‘Purchase Limit’ extension and click the ‘Install’ button under it.
After that, go to the Downloads menu tab from the admin dashboard. Here, you will see a list of all the digital downloads you created for your site.
Simply click the ‘Edit’ link under the product where you want to set a purchase limit.
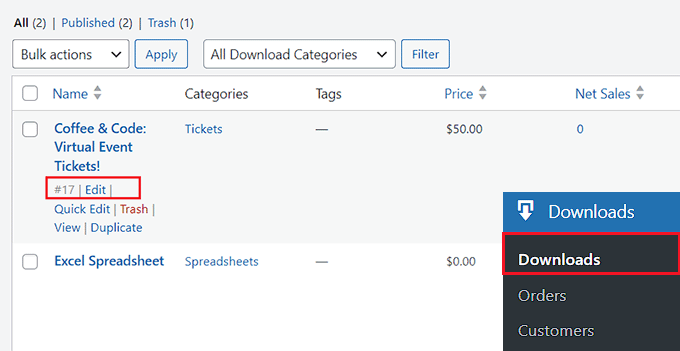
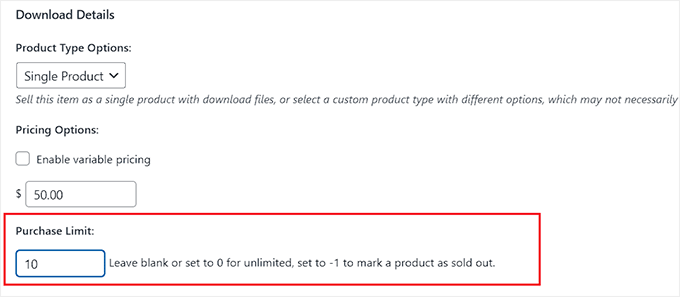
This will open the block editor, where you must scroll down to the ‘Download Details’ section.
Here, you can type the number of tickets or copies of the digital product that you are selling under the ‘Purchase Limit’ option.
For instance, if you have ten tickets to sell for an event, then you can add 10 as the value in the field. When your store sells these 10 tickets, your purchase button text will change to ‘Sold Out’ automatically.
This way, you won’t be able to oversell out-of-stock products to customers.
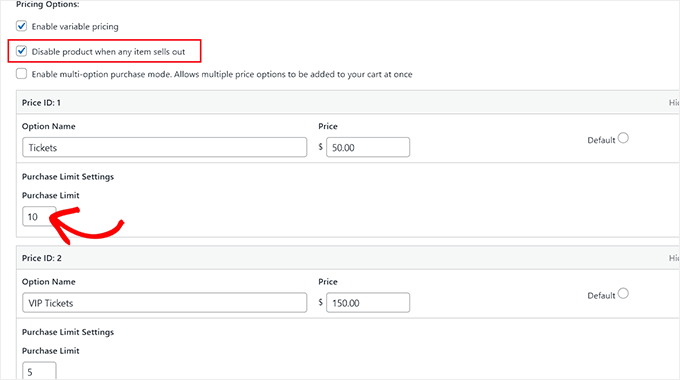
If you have added multiple price options for your digital product, then you can also set different purchase limits for various packages.
For example, if you have 10 normal tickets and 5 VIP ones to sell for an event, then you can set different purchase limits for them.
You can also check the ‘Disable product when any item sells out’ option. This feature is only available if you have multiple pricing plans for a product.
This means that your product will be removed from the catalog once it sells out.
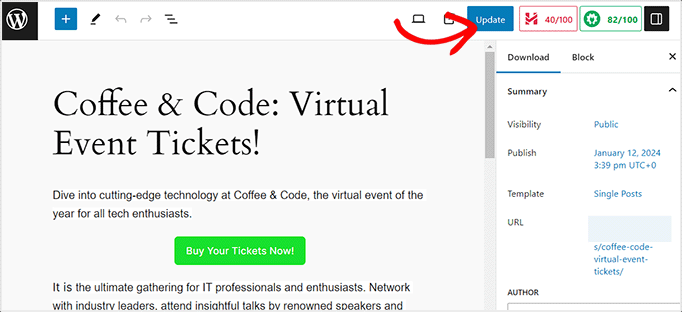
Finally, go back to the top of the page and click the ‘Update’ or Publish’ button to store your settings.
You have now successfully prevented overselling your out of stock digital product.
If you want to set a default purchase limit for all the digital products on your website, then you can do that by visiting the Downloads » Settings page and switching to the ‘Misc’ tab.
Next, click on ‘File Downloads’ to open more settings on the page.
From here, set a default limit for all your products by typing a value next to the ‘File Download Limit’ option.
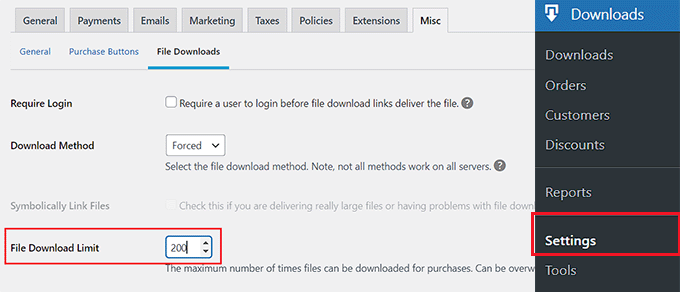
This will be the maximum number of times each file can be purchased and downloaded from your site. Once that limit is reached, the product status will then automatically change to ‘Sold Out’.
Once you are done, don’t forget to click the ‘Save Changes’ button to store your settings.
Prevent Overselling Out of Stock Items in WP Simple Pay
If you use WP Simple Pay on your website, then this method is for you.
WP Simple Pay is the best WordPress Stripe plugin on the market that makes it super easy to add a payment form to your website.
It is an ideal choice if you have a membership site that accepts subscription payments or if you host workshops like cooking lessons, dance classes, coding, and more.
You may have a limited number of subscriptions to offer or a limited number of openings for your class and do not want to oversell your services or subscriptions. In that case, you can easily avoid overselling using WP Simple Pay’s purchase restrictions feature.
First, you need to install and activate the WP Simple Pay plugin. For detailed instructions, see our step-by-step guide on how to install a WordPress plugin.
Note: WP Simple Pay has a free plan but you will need the pro plan of the plugin to unlock the purchase restrictions feature.
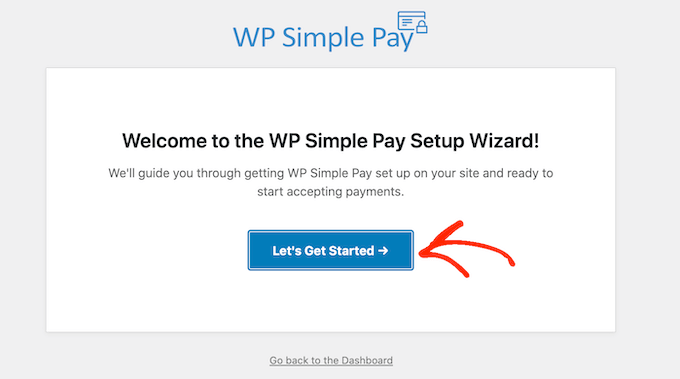
Upon activation, a setup wizard will be launched on the screen where you must click the ‘Let’s Get Started’ button.
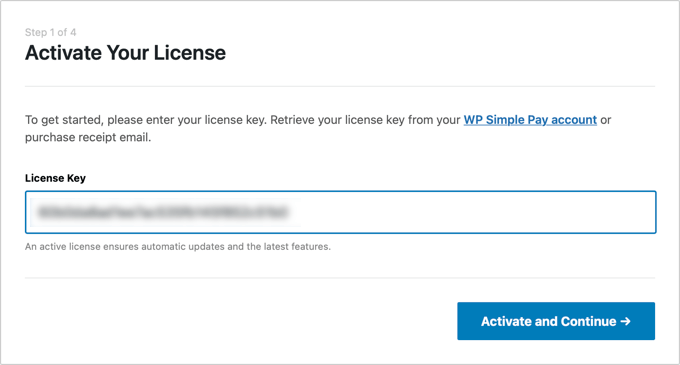
You will be guided to the first step, where you must add your license key and click the ‘Activate and Continue’ button.
You can find this information in your account on the WP Simple Pay website.
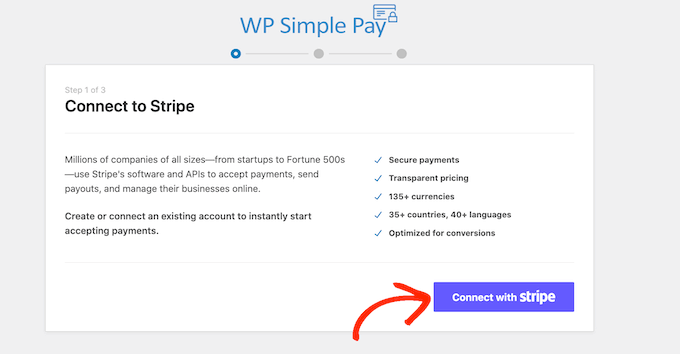
Next, you have to connect your Stripe account with the plugin.
To do this, click the ‘Connect with Stripe’ button.
After that, you must log in to your Stripe account to connect it with WP Simple Pay. Once you do that, you must configure the other setup wizard steps.
For more information, see our tutorial on how to create WordPress forms with a payment option.
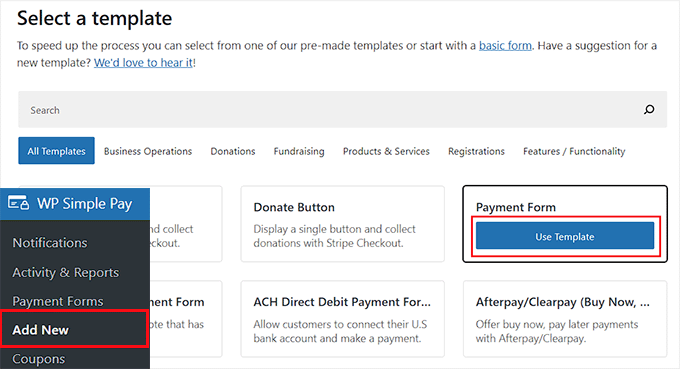
Next, visit the WP Simple Pay » Add New page from the WordPress admin sidebar. This will take you to the ‘Select a template’ page where you can click the ‘Use Template’ under any template.
For this tutorial, we will be creating a simple payment form.
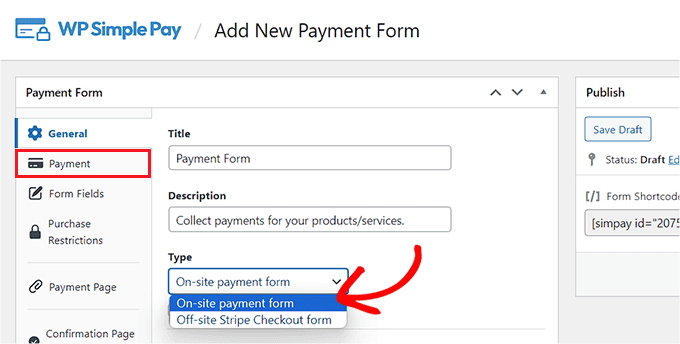
This will launch the form builder, where you can start by adding a title and description for your form.
After that, you can select ‘On-site payment form’ as the type and then switch to the ‘Payment’ tab.
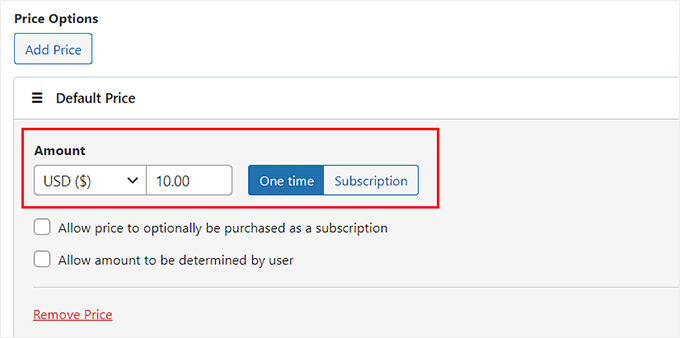
Here, you can scroll down to the ‘Price Options’ section and add an amount for your product or service.
You can also add multiple price options by clicking on the ‘Add Price’ button.
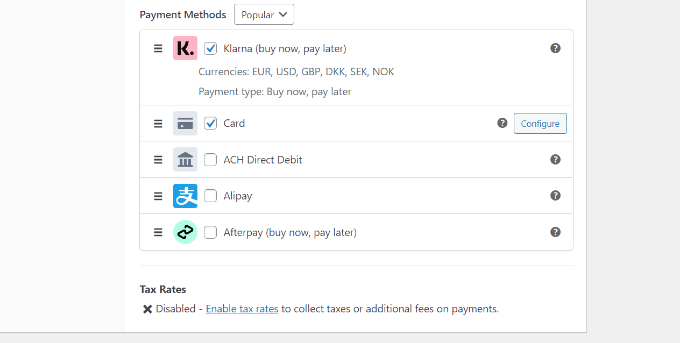
Then, you can scroll down to the ‘Payment Methods’ section and check the box next to the payment method you want to add to your site.
You can add AliPay, Klarna, AfterPay, and any other methods that you like.
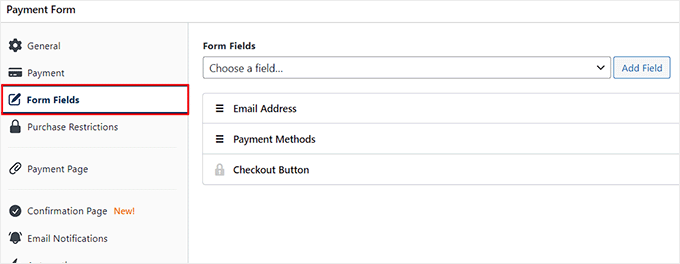
Once you have done that, you can switch to the ‘Form Fields’ tab to add, rearrange, or delete fields in the form according to your liking.
For more detailed instructions, see our tutorial on how to accept payments with Stripe in WordPress.
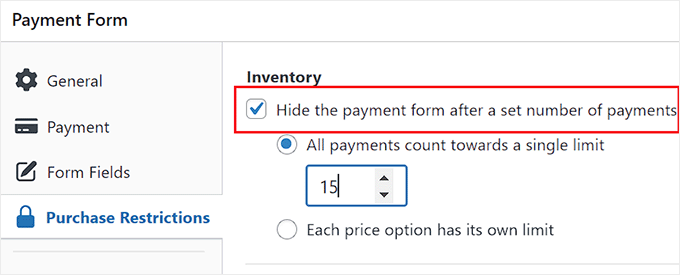
Next, switch to the ‘Purchase Restrictions’ tab and check the ‘Hide the payment form after a set number of payments’ option.
Once you do that, type the number of subscriptions that you want to sell with your form.
For example, if you run a dance class and have room for 15 students only, then you can type the number 15 into the ‘All payments count towards a single limit’ field. This means that once 15 users fill out your form and pay the fees, the form will be hidden from other users, preventing overselling.
However, if you have multiple pricing plans in your form, then you can select the ‘Each price option has its own limit’ option and add the availability number for individual pricing packages.
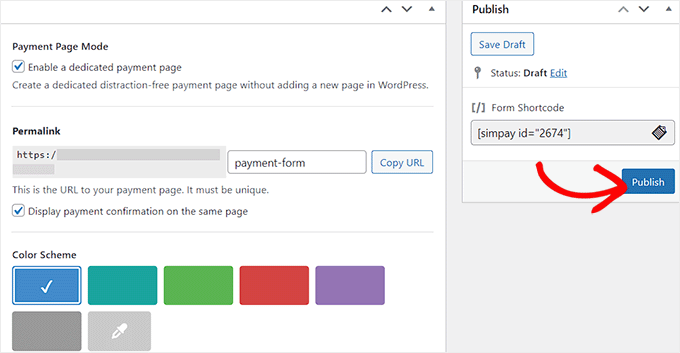
Next, you can switch to the ‘Payment Page’ tab and check the ‘Enable a dedicated payment page’ option.
You can now create a custom page for your payment form by adding a permalink, color scheme, image, and footer text. Once you are done, don’t forget to click the ‘Publish’ button to store your settings.
You have now successfully prevented overselling your membership subscriptions or classes with WP Simple Pay.
Bonus! Inventory Management Tips for Your Online Store
Apart from preventing overselling out of stock products, here are some other inventory management tips that can help boost traffic to your online store and lead to more conversions.
For instance, you should regularly count your physical inventory to avoid any discrepancies between your online store record and actual products. You can also categorize your products based on popularity, value, and lead time for better management.
You must also analyze the past sales trends in your store to predict future demand and adjust your inventory levels accordingly. You can easily do this using MonsterInsights, which is the best analytics solution on the market.

The plugin can show you an overview report for metrics like total sales, revenue, average order value, and conversion rate. You can adjust the reports to analyze older data by setting a custom date range easily.
For more details, see our guide on how to properly set up eCommerce tracking in WordPress.
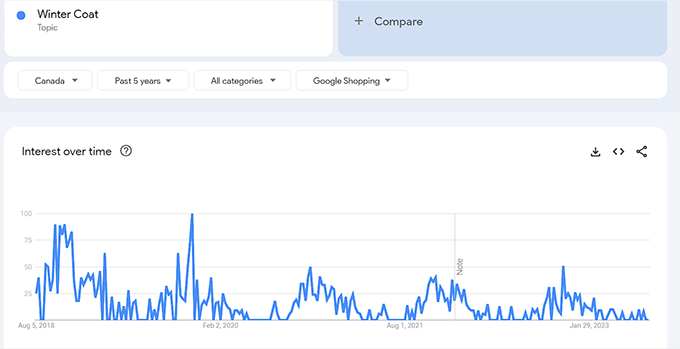
Additionally, you should keep an eye on industry trends and competitor activity to predict any changes in demand for your product.
You can do this with Google Trends. For more information, see our tutorial on how to use Google Trends to improve SEO and grow your business.
Some other tips for better inventory management include adding discount offers for less popular items and organizing your inventory according to product type.
Using all these tips will help you get ahead of your competitors and ultimately get more sales.
We hope this article helped you learn how to prevent overselling out of stock items in WordPress. You may also want to see our beginner’s guide on how to increase WooCommerce sales and our top picks for the best WooCommerce themes for your store.
If you liked this article, then please subscribe to our YouTube Channel for WordPress video tutorials. You can also find us on Twitter and Facebook.
[ad_2]
Source link
